Couldn't wait any longer...
Sorry for the delay. It's been a while, but I've been up to a lot of things lately.
Anyway, I got tired of waiting for parts for a few other locomotives that I'm working on, so I decided to start working on something else I had on the workbench.
A few years ago, I happened upon a bargain: a powered Athearn 9-44CW for ten bucks. I picked it up and received a shell that was spray painted green and covered in glue marks. But that didn't matter too much. I stripped the shell and found it still had glue marks...that did matter.
So, I went out looking and found another 9-44CW shell and an unpowered AC4400CW. Now, I know what you're thinking...there's no AC4400CWs decorated for CN...and you're right. But I live in that alternate universe where razor saws and styrene sheet can change things. Unfortunately, I also sat and looked at it for months and months when I could have gotten started on my project.
And the project is...to turn that AC4400CW into a CN ES44DC. Here it is in its original form:
 Now, I do have to say I was hesitant to cut this unit up, as a week later there was one on eBay that was exactly the same as this one, and it must have been special because it was going for around $200 at the time. But, after an exhaustive search, I found nothing special about an unpowered KCS AC4400. So, last weekend, the razor saw and I had some fun.
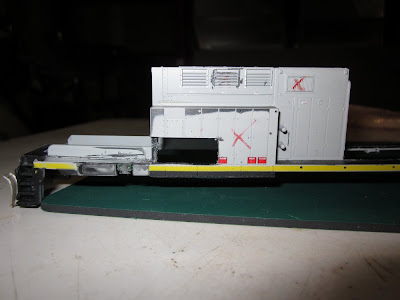 The rear hood was almost completely removed using both a razor saw and an X-Acto knife. I had to work slowly, as one bad move and this shell would have been trashed. I kept the rear of the unit intact so that I didn't have to build it from scratch. Items marked with an X in the picture are supposed to be removed, but I may end up not removing everything (it doesn't have to be perfect)
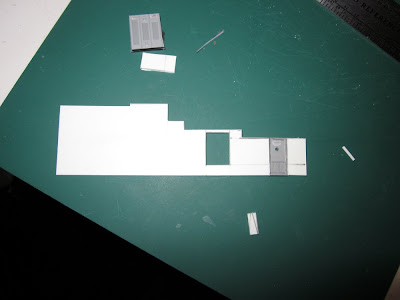
 I measured the plans and then started cutting new sides from styrene sheet. This was the first time I've used a square and my scale rule to make sure every cut was perfect. While the locomotive doesn't have to look perfect in every last detail, the cuts do need to be dead on. I made sure to cut out places where the grills are going to be done with mesh screen for a cool see-through effect.
 I also made sure to salvage the brake wheel area from the original shell, as I'm not going to try to make one that looks better than the Athearn part. I know my limits...
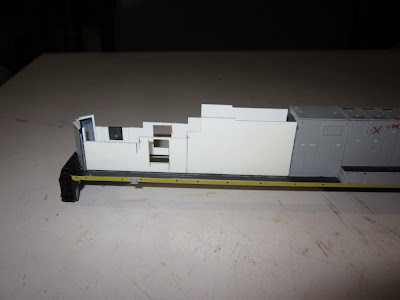 Here are the sides after being added on to the shell. I put them on the chassis to see how things lined up, and at this point, although it looks plain, it is looking right to me.
 Another shot of the new sides from the other side. This is like a cake without icing...
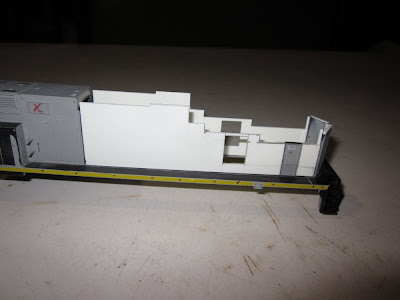
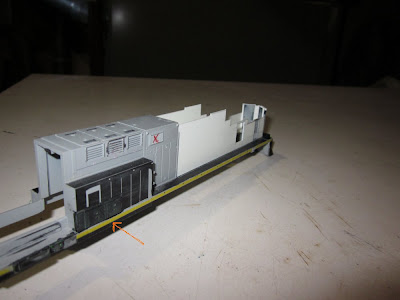 This is a long view of the long hood. This also has a red arrow pointing out something. In the drawings, the area where the arrow is pointing does not exist. It does exist, however, on CN units. So, I cut out the offending area and replaced it with parts from that original 9-44CW shell. It is worth the work to get this part right, and since that original shell was all glue marks anyway, it was going to go to the trash. May as well salvage what I can.

 Here is the loco to this point sitting on my computer. I have added the side doors (which I realize will need knuckle busters), the top doors (which need hinges and lift rings), and I am going to add more doors and screens to the back of the unit.
 From the other side. I also made sure that the area around the exhaust was raised in the middle and tapered out to the sides of the locomotive. I wasn't sure about this, and the drawings didn't make it clear. A quick Google search and I had the evidence I needed. I will be re-using the Athearn parts for this area, as I cannot make an exhaust look that good.
The things I didn't show: the beautiful Kaslo Shops cab and 9-44CW detail kit. I will be using them for the cab, anticlimbers, and ditch lights on this locomotive. As I continue to work on the unit, I will be adding the class lights (which will feature LED lighting), screens, and handrails. This will also probably be the first unit I will be painting by airbrush. It is going to be an adventure, and as soon as I have more parts in, I will be posting more photos and details.
Hopefully I won't take as long this time....
From the other side. I also made sure that the area around the exhaust was raised in the middle and tapered out to the sides of the locomotive. I wasn't sure about this, and the drawings didn't make it clear. A quick Google search and I had the evidence I needed. I will be re-using the Athearn parts for this area, as I cannot make an exhaust look that good.
The things I didn't show: the beautiful Kaslo Shops cab and 9-44CW detail kit. I will be using them for the cab, anticlimbers, and ditch lights on this locomotive. As I continue to work on the unit, I will be adding the class lights (which will feature LED lighting), screens, and handrails. This will also probably be the first unit I will be painting by airbrush. It is going to be an adventure, and as soon as I have more parts in, I will be posting more photos and details.
Hopefully I won't take as long this time....
 Now, I do have to say I was hesitant to cut this unit up, as a week later there was one on eBay that was exactly the same as this one, and it must have been special because it was going for around $200 at the time. But, after an exhaustive search, I found nothing special about an unpowered KCS AC4400. So, last weekend, the razor saw and I had some fun.
 The rear hood was almost completely removed using both a razor saw and an X-Acto knife. I had to work slowly, as one bad move and this shell would have been trashed. I kept the rear of the unit intact so that I didn't have to build it from scratch. Items marked with an X in the picture are supposed to be removed, but I may end up not removing everything (it doesn't have to be perfect)
 I measured the plans and then started cutting new sides from styrene sheet. This was the first time I've used a square and my scale rule to make sure every cut was perfect. While the locomotive doesn't have to look perfect in every last detail, the cuts do need to be dead on. I made sure to cut out places where the grills are going to be done with mesh screen for a cool see-through effect.
 I also made sure to salvage the brake wheel area from the original shell, as I'm not going to try to make one that looks better than the Athearn part. I know my limits...
 Here are the sides after being added on to the shell. I put them on the chassis to see how things lined up, and at this point, although it looks plain, it is looking right to me.
 Another shot of the new sides from the other side. This is like a cake without icing...
 This is a long view of the long hood. This also has a red arrow pointing out something. In the drawings, the area where the arrow is pointing does not exist. It does exist, however, on CN units. So, I cut out the offending area and replaced it with parts from that original 9-44CW shell. It is worth the work to get this part right, and since that original shell was all glue marks anyway, it was going to go to the trash. May as well salvage what I can.

 Here is the loco to this point sitting on my computer. I have added the side doors (which I realize will need knuckle busters), the top doors (which need hinges and lift rings), and I am going to add more doors and screens to the back of the unit.
 From the other side. I also made sure that the area around the exhaust was raised in the middle and tapered out to the sides of the locomotive. I wasn't sure about this, and the drawings didn't make it clear. A quick Google search and I had the evidence I needed. I will be re-using the Athearn parts for this area, as I cannot make an exhaust look that good.
The things I didn't show: the beautiful Kaslo Shops cab and 9-44CW detail kit. I will be using them for the cab, anticlimbers, and ditch lights on this locomotive. As I continue to work on the unit, I will be adding the class lights (which will feature LED lighting), screens, and handrails. This will also probably be the first unit I will be painting by airbrush. It is going to be an adventure, and as soon as I have more parts in, I will be posting more photos and details.
Hopefully I won't take as long this time....
From the other side. I also made sure that the area around the exhaust was raised in the middle and tapered out to the sides of the locomotive. I wasn't sure about this, and the drawings didn't make it clear. A quick Google search and I had the evidence I needed. I will be re-using the Athearn parts for this area, as I cannot make an exhaust look that good.
The things I didn't show: the beautiful Kaslo Shops cab and 9-44CW detail kit. I will be using them for the cab, anticlimbers, and ditch lights on this locomotive. As I continue to work on the unit, I will be adding the class lights (which will feature LED lighting), screens, and handrails. This will also probably be the first unit I will be painting by airbrush. It is going to be an adventure, and as soon as I have more parts in, I will be posting more photos and details.
Hopefully I won't take as long this time....


Comments